Cakes & Cupcakes • Currently Craving
Mini Pumpkin Whoopie Pies
November 20, 2022
Here’s the thing. I don’t really like pumpkin pie. I know, I know. Who am I?? I don’t dislike pumpkin in […]
Here’s the thing. I don’t really like pumpkin pie. I know, I know. Who am I??
I don’t dislike pumpkin in general…I’m obsessed with this Pumpkin Bread with Streusel Topping and don’t even get me started on these Chewy Pumpkin Chocolate Chip Cookies. They’re the best ever! It’s really more about the texture than it is about the flavor. Plus, I’m just not a fan of the whole pie making process. But can we talk about pumpkin WHOOPIE pies?? Yes, please!

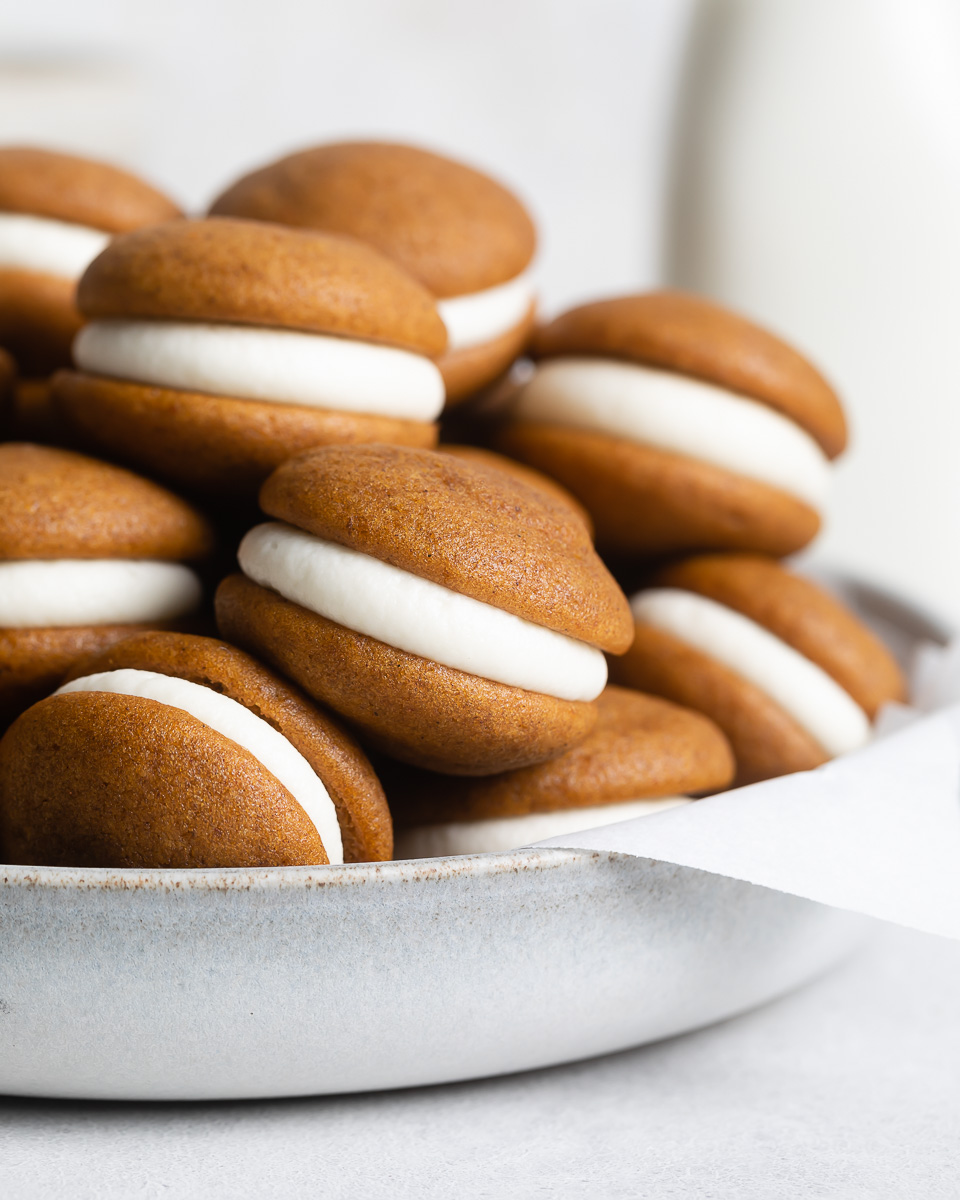
These light and pillowy-soft pumpkin whoopie pies are the ultimate Fall dessert the whole family will love. Made with the perfect hint of cozy fall spices and a sweet maple cream cheese frosting, they make the cutest bite-size dessert. Chock full of delicious pumpkin flavor, easy to make {and fun to eat!}, these whoopie pies are the best thing to happen to Thanksgiving!
What exactly is a whoopie pie?
Some say that whoopie pies are part cookie, part cake. If we’re being technical, they are actually more like an inside out cupcake with the cake on the outside and a swirl of frosting on the inside. Whoopie pies resemble a sandwich cookie {oh how I love a sandwich cookie!} but have the consistency of cake. So I think it’s safe to say that whoopie pies are the best of both worlds. Whoopie pies, also known as gobs, are a beloved baked good said to have originated in the Northeast. States like Pennsylvania and Maine lay claim to having invented this classic dessert. All I know is that they are downright delicious. If you haven’t had a whoopie pie before, you’re in for a real treat!

Ingredients
These pumpkin whoopie pies come together in no time with a just a handful of baking staples and a sprinkling of warm Fall spices. Here’s what you’ll need:
- Flour
- Vegetable oil
- Pumpkin puree
- Eggs
- Dark brown sugar
- Baking powder and baking soda
- Salt
- Vanilla
- Pumpkin pie spice
- Butter
- Cream cheese
- Powdered sugar

How to make homemade whoopie pies
Making these fluffy, cake-like cookies is easy. Just follow the step-by-step guide and scroll down for the full recipe and detailed instructions.
- Step 1: Preheat the oven to 350°F. Line two baking sheets with parchment paper or silicon mats.
- Step 2: Sift together the flour, baking soda, baking powder, spices and salt. Set aside.
- Step 3: Mix together the brown sugar and oil until well combined. Add the pumpkin and vanilla and whisk until fully incorporated.
- Step 4: Add the eggs one at a time, scraping down the sides of the bowl after each addition.
- Step 5: Add the dry ingredients to the pumpkin mixture and stir until just combined. Do not overmix.

- Step 6: Transfer the batter to a large piping bag fitted with a plain tip, or fill a large ziplock bag and cut off the tip of one corner. Pipe the batter onto the parchment paper or silicon mat.
- Step 7: Bake for 8 to 9 minutes or until the cakes are set on top and a toothpick inserted comes out clean. Do not overtake or the cakes will be dry.
- Step 8: Remove the whoopie pies from the oven and allow to cool completely.
- Step 9: Make the maple cream cheese frosting. Transfer the frosting to a piping bag and pipe 1 tablespoon of filling onto the flat side of a whoopie pie. Top with a second whoopie pie and gently press together to form a sandwich. Chill for 20 to 30 minutes to set.

Tips for perfect pumpkin whoopie pies
Follow these foolproof tips for perfect whoopie pies every time.
- Use chilled pumpkin. For best results, place a can of pure pumpkin puree in the refrigerator at least an hour before mixing the batter. I use Libby’s 100% Pure Pumpkin for this recipe. Not sponsored, just a fan.
- Don’t skimp on the spices. I promise these whoopie pies are perfectly pumpkin-y with just the right amount of cozy Fall flavor.
- Do not over mix. The batter is similar to cake batter so you’ll want to avoid overtaxing. Keep the stirring to a minimum once you add the flour and they’ll rise up light and pillowy soft.
- Pipe the batter. For the prettiest pies I highly recommend piping the batter onto the cookie sheets rather than scooping it. If you don’t have a piping tip or bag handy, not to worry. Simply place the batter in a large ziplock bag and cut one corner off to pipe the batter. Then to smooth the tops, dampen your finger with a bit of water and gently brush over any lumps and bumps on top. Once baked, the tops will be smooth and shiny.
- Do not over bake. One of the reasons I love these mini whoopie pies so much is that the texture is soft, moist and perfectly tender. They’ll literally melt in your mouth. Keep an eye on your oven and do not overbake. Once a toothpick inserted in the center of the cake comes out clean or with just a few crumbs remaining, remove the baking sheet from the oven.
- Cool completely. Waiting to fill these whoopie pies with the maple cream cheese frosting is hard to do, but I promise you it’s well worth the wait. Do not attempt to assemble the whoopies until they are completely cool to the touch or the frosting will melt.
- Chill before serving. Ok, I’m not gonna lie. I ate like three of these before they even made it to the fridge but can you blame me? They’re positively irresistible! But, take it from me, these pumpkin whoopie pies are seriously scrumptious eaten straight from the fridge once the frosting has a chance to set. About 20 to 30 minutes of chill time is perfect.

How to assemble whoopie pies
These cute as can be mini pumpkin whoopie pies are made extra delicious with a maple cream cheese filling that you’re going to want to smother on everything that comes out of your oven. The frosting is sweet, but not overly sweet and it pairs perfectly with the warm pumpkin spices in the cake.
For best results, firm up the frosting a bit by refrigerating it for 10 to 15 minutes before assembling the whoopie pies. You can pipe a dollop of the maple cream cheese frosting onto the mini cakes, or if you’re feeling fancy, use a star tip to create a pretty swirl. Using a spoon or spatula to scoop the frosting onto the cakes is 100% acceptable too.
If you’re feeling frisky you could sub the maple syrup for one tablespoon of good quality bourbon for a boozy version of these bite size goodies. Now that’s a holiday dessert I can get behind! Once you’ve assembled your mini pumpkin whoopie pies, place them in the fridge to allow the frosting to set. I suggest you enjoy a spoonful of frosting while you wait.

Storing whoopie pies
The good news is that you won’t be able to resist these mini pumpkin whoopie pies. The bad news is that you won’t be able to resist these mini pumpkin whoopie pies. Mini desserts are meant to be eaten in multiples so I’m counting on you to have at least two or three. Or five! Who’s counting?
Keep any leftovers tightly covered in the refrigerator for up to three days. The cakes themselves can be sticky so be sure to store them in a single layer or place a sheet of wax paper between stacks. They can be frozen for up to 2 months. Defrost at room temperature before serving.
Don’t forget to bookmark this recipe for the holidays. These mini desserts would make the perfect finale to your Thanksgiving feast!
Happy baking!
If you love these Mini Pumpkin Whoopie Pies, be sure to try these other Fall favorites…
- Pumpkin Chocolate Swirl Muffins
- Apple Cider Bundt Cake
- Chocolate Dipped Brown Butter Pumpkin Madeleines
- Easy Butterscotch Bundt Cake
- The Ten Best Thanksgiving Desserts

Mini Pumpkin Whoopie Pies Recipe
- Prep Time: 20 minutes
- Cook Time: 8 minutes
- Total Time: 28 minutes
- Yield: 18 1x
- Category: Cakes & Cupcakes
- Method: Baking
- Cuisine: American
Description
Made with the perfect hint of cozy Fall spices and a sweet maple cream cheese frosting, these mini pumpkin whoopie pies make the cutest bite-size dessert. Chock full of delicious pumpkin flavor, they’re easy to make and fun to eat!
Ingredients
Whoopie Pies
- 3 cups (390 g)all-purpose flour, spooned and leveled
- 1 teaspoon baking soda
- 3/4 teaspoon baking powder
- 1 teaspoon salt
- 1 1/2 tablespoons ground cinnamon
- 1 teaspoon ground ginger
- 3/4 teaspoon all-spice
- 1/2 teaspoon ground nutmeg
- 2 cups (400 g) dark brown sugar, firmly packed
- 1 cup canola oil
- 1 15–ounce can pumpkin puree, chilled (do not use pumpkin pie filling)
- 1 1/2 teaspoons vanilla
- 2 large eggs, room temperature
Maple Cream Cheese Filling
- 1/2 cup (113 g) unsalted butter, room temperature
- 4 tablespoons cream cheese, room temperature
- 2 1/3 cups confectioner’s sugar, sifted
- 2–3 tablespoons pure maple syrup
- 1–2 tablespoon heavy cream or whole milk
- 1/2 teaspoon vanilla extract
- pinch of salt
Instructions
Whoopie Pies
- Preheat oven to 350°F. Line two baking sheets with parchment paper, or alternatively, place a silicone baking mat with a macaron template on each cookie sheet. Set aside.
- In a medium bowl, whisk together flour, baking soda, baking powder, salt and spices. Sift together into another bowl and then sift once more. Set aside.
- In the bowl of a stand mixer fitted with the whisk attachment, mix together the oil and brown sugar on medium speed until well combined.
- Add the pumpkin and vanilla and mix on medium low until well incorporated.
- Add eggs, one at a time, mixing on medium low. Scrape down the bowl after each addition.
- Add the sifted dry ingredients to the bowl with the wet ingredients and mix on low speed until incorporated. When a few streaks of flour remain, remove the bowl from the mixer and use a large spatula to fold together the batter with just one or two more turns of the bowl. Do not over mix.
- Spoon the batter into a large piping bag fitted with a large round tip. Or alternately, transfer the batter into a large plastic bag and snip off the corner of the bag to pipe the batter.
- Pipe the batter into 1 1/2 inch rounds on the parchment paper lined cookie sheets or use the macaron template as a guide. The batter will not spread much while baking but leave an inch between each whoopie pie.
- Bake the whoopie pies for 8 to 9 minutes. Once fully baked, the pies should spring back when touched and a toothpick inserted in the center should come out clean. Do not over bake.
- Remove the pan from the oven and place on a cooling rack for 10 minutes. Carefully remove the whoopie pies from the pan and transfer to a wire rack to cool completely before filling.
- To assemble the whoopie pies, place a dollop or swirl of maple cream cheese frosting on the flat side of one pie and then top with the flat side of another whoopie pie. Gently press together to create a sandwich. Place the assembled whoopie pies in the refrigerator for 30 minutes to chill, allowing the frosting to set.
Maple Cream Cheese Frosting
- Place the softened butter and cream cheese in the bowl of a stand mixer fitted with the paddle attachment. Mix on medium high speed for 2 minutes.
- Add the sifted confectioner’s sugar, 1/2 cup at a time, mixing on low speed until incorporated. Once all the sugar has been added, increase the speed to medium high and mix for two minutes until smooth. Scrape down the sides of the bowl as needed.
- Add the maple syrup, starting with 2 tablespoons and adding a third tablespoon for more flavor if desired. Mix on medium high speed until incorporated.
- Add the heavy whipping cream (or whole milk), vanilla and salt. Mix on medium high speed for one to two minutes or until smooth and creamy.
- Place frosting in a large piping bag fitted with a large round tip. If frosting becomes too soft and warm, place it in the refrigerator for 10 to 15 minutes and then resume filling the whoopie pies.
Notes
Store whoopie pies tightly covered in the refrigerator for up to 3 days.
May be frozen. Defrost at room temperature before serving.
*Recipe adapted from Matt Lewis’ Baked, as seen on Martha Stewart.


Chewy Pumpkin Chocolate Chip Cookies

6 Comments
Jeanette
October 30, 2024 at 11:01 amJust made the cake part and they are both delicious and beautiful!
Will make the filling tonight and keep you posted. My batch came out much larger than 18 sets but maybe I didn’t pipe my batter as tall, More for everyone!
Love it so far, very well written and detailed recipe.
Anonymous
May 23, 2024 at 3:07 pmThat is not swiss meringue buttercream at all. Not even foundationally. This is a joke
Heather Mubarak
May 23, 2024 at 10:38 pmThese whoopie pies are filled with a delicious maple cream cheese frosting, not a Swiss meringue buttercream.
Steph
December 14, 2023 at 1:52 pmThis was my first whoopie pie attempt, they turned out AMAZING! I did a dessert charcuterie board for Thanksgiving and these were the first to go! If you have other whoopie pie recipes, I need them! Thanks so much for sharing!
Laura
March 22, 2024 at 4:09 amTurned out sooooo good! Had to make a couple modifications (based on what ingredients I had on hand) but this is my new go to for whoopie pies!
Connie
December 22, 2022 at 9:08 pmThese were amazing! Made them for Thanksgiving and not only the adults but the children loved.