Cookies • Gluten Free • Sweets
Hot Fudge Sundae Macarons
June 28, 2020
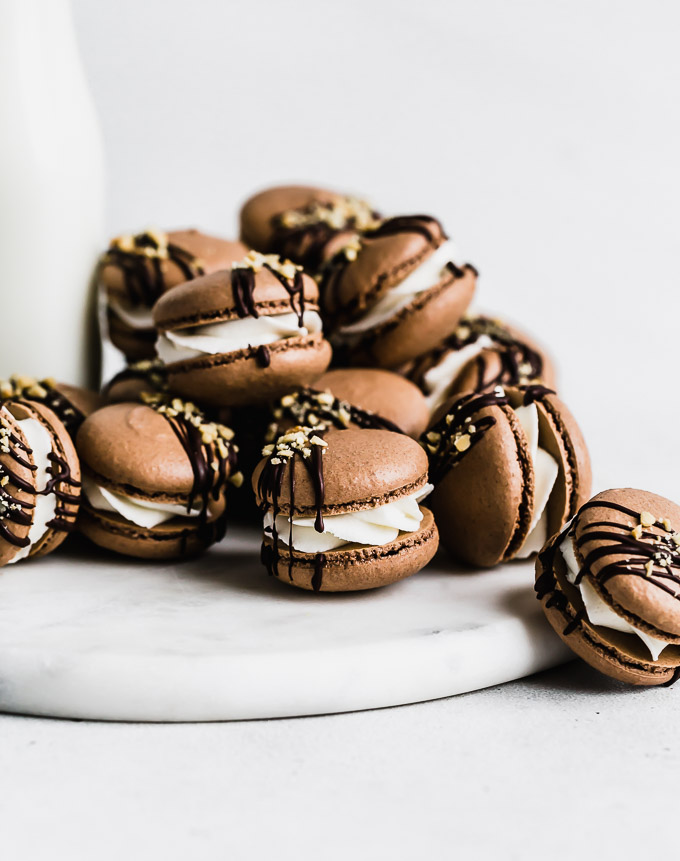
A rich, chocolatey macaron filled with a dollop of hot fudge and a swirl of creamy vanilla buttercream. Topped off […]
A rich, chocolatey macaron filled with a dollop of hot fudge and a swirl of creamy vanilla buttercream. Topped off with a dark chocolate drizzle and crushed peanuts. I mean…these hot fudge sundae macarons have it ALL and then some. Recipe comes with all then tips and tricks you need to make perfect macarons every single time!

It’s no secret that I’m a big fan of a little sandwich cookie and I’ve been dreaming about these hot fudge sundae macarons for the better part of a year now. I couldn’t be more excited to share this recipe with you here on the blog. It’s the most delicious flavor combination and I just know you’re going to love it just as much as I do. Ever since our trip to Paris last spring I’ve been a teensie bit obsessed with learning all the ins and outs of making the perfect macarons. These pretty as can be French macarons have quite the reputation for being the world’s most finicky cookie. And while the words “easy” and “macaron” aren’t often used in the same sentence, I’m here to tell you that with a little patience and practice, you too can become a macaron master!

If you are brand spanking new to making macarons, I suggest you take a peak at my Beginner’s Guide to French Macarons. It’s a helpful first-timer’s introduction to making macarons that is filled with tons of tips and tricks and all the how-to’s you need to take all the mystery out of macaron making. A classically trained baker I am not, but even professionally trained experts can have a bad day in the kitchen when making these notoriously temperamental cookies. Even the weather {yes, the weather!} plays a role in the outcome of these fussy French cookies.
If making perfect French macarons is an item on your baker’s bucket list, you’ve come to the right place. Read on for all the info you need to make these ultimate fancy-pants cookies and bake a batch of these decadently delicious hot fudge sundae macarons. We’re talking a rich, chocolatey mac filled with a dollop of hot fudge and a swirl of creamy vanilla buttercream. Topped off with a dark chocolate drizzle and crushed peanuts. I mean…these macarons have it ALL and then some.
I’m not drooling, you’re drooling!

HERE’S WHAT YOU’LL NEED
Before getting started you’ll want to stock up on a few tools of the trade. I’ve listed my favorite must-haves below and substitutes when available for easy reference.
Kitchen scale. Macarons are one finicky little cookie in part because your measurements for each of the ingredients need to be very precise. Weigh, weigh, weigh your ingredients! It’s pretty much a non-negotiable when making macarons so pick up a simple digital scale like this one. For a less expensive version, try this one.
Sifter. To ensure smooth tops and lump free batter, you’ll need to sift your dry ingredients several times for best results. You can use a basic sifter or a fine mesh strainer works well too.
Baking sheets. Be sure your cookie sheets are in good condition without any warps or bends. You want your silpat mat or parchment paper to lay perfectly flat for best results.
Silicone mat. I swear by this silpat mat with a built in template for macarons. These are perfect for serving as a guideline when you are piping the macaron batter on to the baking sheet. Believe me, you don’t want to free hand this the first time around and who has time to go drawing perfect circles on parchment anyway? Get this mat and thank me later!
Spatula. Get yourself a trusty spatula that you love because chances are, once you master making these macarons you’ll be eager to make them over and over again. I love these heat resistant spatulas from GIR. They are seamless, fit in my hand just right, and their one piece design makes them easy to clean. Check, check, aaaannnd check!
Piping bag + tips. To pipe the macaron batter and that pretty buttercream swirl, pick up a pack of disposable pastry bags and a few different pastry tips. I use a small circle tip to pipe the macaron batter and a larger, star tip to add the buttercream swirl.
Other than the tools above, you’ll just need a couple of more items and you’re in business! I highly recommend using an oven thermometer which takes a lot of the guesswork out of baking perfect macarons. You’ll also need gel food coloring, some mixing bowls, and a stand mixer fitted with a whisk attachment.

HOW TO MAKE PERFECT HOT FUDGE SUNDAE MACARONS
Weigh your ingredients. If you don’t want to end up with a batch of sad looking macs that will be on the fast track to the trash can, be sure to weigh all of your ingredients. Trust me, I’m the laziest baker around but this step is critical to making glorious little macs that will have you doing a happy dance in your kitchen.
Always use finely ground almond flour. For best results, make certain your almond flour is finely ground and is not actually “almond meal”. Almond flour is much finer and is made from blanched almonds. For those pretty, lump free tops, finely ground is the way to go. I love this almond flour from Bob’s Red Mill and I also use the one from Trader Joes. Not sponsored, just a fan.
Use good quality cocoa powder. Quality matters when it comes to macaron making. Cocoa powder contains acid and this can alter the consistency of your macaron batter. I find that I have the best success with high quality unsweetened cocoa powder like this one from Rodelle. I’ve also had success with Hershey’s Special Dark which you can find at your local grocer.
Opt for “aged” egg whites. Okay, you might be thinking “what the heck are aged egg whites”?? I know. Weird, right? But aged egg whites are just egg whites that have been separated from the yolks and the left to rest in the fridge overnight. Before making the macarons, let the egg whites sit out at room temperature for 1-2 hours. If you forget to separate and chill your egg whites ahead of time, be sure to at least leave your egg whites out at room temperature for a couple of hours before getting started.
Sift, sift, and sift some more! You might be tempted to skip this step to save time, but don’t even think about it. To achieve the fine, powdery texture you need for smooth, shiny macarons, it’s crucial to sift the dry ingredients. I always sift my ingredients four times for good measure.
It’s all about the meringue. Let’s be honest, getting the meringue just right is a feat in and of itself. If you are having trouble making macarons that have smooth, glossy tops and perfect little feet, you may be making a mistake with the meringue. This step is one that consistently trips people up but with a little practice and persistence you’ll master meringue making in no time. The trick is to whip the egg whites and sugar until it reaches stiff, glossy peaks that hold their form when the whisk is turned upright. The meringue should cluster and almost hug the whisk attachment without flopping over when inverted. If the meringue is not whipped enough, the peaks will be very long and will fall over. If it has been whipped too much, the peaks will be very short and the meringue may look chunky and separated. Master the meringue and you’ll be on your way to perfect macarons!

LET’S TALK MACARONAGE
Macraronage, also known as folding, is probably the most important stage in making macarons. It’s also the one that a lot of bakers get wrong. As a general rule, I fold the dry ingredients into the wet ingredients in 2 or 3 batches. This will help you regulate your folding. For proper consistency you’ll likely complete 40-60 folds of the batter. Keep in mind, folding is not the same as “stirring”. Do not confuse the two. Stirring the batter too vigorously can over work the batter and knock too much air out of the meringue. To test for proper consistency, use the figure 8 method. Simply lift a small amount of batter with your spatula, then drop it back into the bowl in a figure 8 pattern. If the edges soften and the 8 is absorbed back into the batter within 10 seconds, your batter is ready to pipe. If the batter breaks off of the spatula and does not reabsorb into the bowl, you’ll need to complete a few more folds and try again. This step is a bit tricky but once you know, you know!

TIME TO TROUBLSHOOT
I’d love to say that all of you will ace macaron making on your very first try. I sure as heck didn’t, but you just might! One misstep and your macarons may turn out hollow, flat, cracked, burnt or all of the above. But the journey of making these magical little cookie sandwiches is one of trial and error and along the way you’ll learn more and more about the process with each failure and triumph. And then one day it all clicks, the stars align, and you’ll pull from the oven the most glorious, light and airy batch of macarons with smooth, shiny tops and perfectly dainty feet. Take it from me, once you turn that corner you’ll be forever obsessed with these elegant little confections. If you are having trouble making macarons, check out my troubleshooting guide below for more tried and true tips + tricks. I’m here to help so feel free to fire away in the comments below with your most pressing questions.
Why are my macarons cracked? Cracked macarons are often the result of excess air that has been trapped inside the batter. To avoid this, be sure to firmly tap the baking sheet against the countertop three times once you have piped the batter onto the template. Also be sure to use an oven thermometer to check that your oven is not running too hot. Always bake one cookie sheet at a time when making macarons and rotate the pan halfway through baking.
Why don’t my macarons have feet? Ugh, the worst. You go to all the trouble to follow the recipe step by step and when you peak in the oven your macarons are flat as a pancake. But don’t despair. There are handful of reasons that your macarons may not develop feet and most of them are a quick fix. Macarons with no feet are likely due to a low oven temperature, the macaron shells not having ample time to dry out before baking, or perhaps the air is too humid. Pro tip: Take it from me…don’t make macarons when it’s humid. It takes forever and a day for the macarons to dry out and develop a “skin” when there is too much moisture in the air. Told you these pesky little cookies were temperamental! Use an oven thermometer to check the temp and be sure you hold off on baking until your macarons are completely dry to the touch.
What do I do if my macarons won’t dry out? As a general rule, you should allow the piped macarons to rest for about 30 minutes to an hour before baking. Sometimes it seems the macarons never develop a “skin” and no matter how long you linger around the kitchen, the batter still seems wet. This could be entirely due to the weather but it could also be the result of over mixing or a batter that is simply too wet. Be sure to use only gel food coloring in macaron batter as other liquid colorings can alter the consistency. When folding the dry ingredients together with the meringue, be deliberate in your motions and use the figure eight technique to gauge when the batter is ready.
Why are my macarons hollow? Macarons that are hollow with gaps inside the shell are likely due to either under baking or improperly whipped meringue. Check your oven temperature and be sure to bake your macarons between 300 and 325 degrees according to the recipe directions. Be sure to whip the egg whites until stiff, glossy peaks form. The meringue should ball up inside the whisk and have as little moisture as possible for best results. To check for doneness, test one macaron for a hollow center before pulling out the whole tray.
What makes macaron tops bumpy? This problem pops up often and is probably the easiest fix of them all. Lumpy, bumpy macaron tops are usually the result of ingredients not being sifted properly. It can also be caused by not mixing the batter correctly. For best results, always sift the dry ingredients two to three times and as you are mixing the batter, take time to press the mixture up against the sides of the bowl as you fold the ingredients. This helps to knock some of the air out of the mixture and incorporate the dry ingredients into a homogenous batter leaving you with smooth, glossy tops.


Phew, that was a LOT of info and if you read this far you deserve a cookie. For real! I hope you’ll put on your baker’s hat and give these crazy delicious hot fudge sundae macarons a whirl. They really are worth all the trouble and I just know you’re gonna love them. Happy baking friends!
If you love these Hot Fudge Sundae Macarons, you’ll also love….
Beginner’s Guide to French Macarons
Chocolate Hazelnut Sandwich Cookies
Chocolate Salted Caramel Sandwich Cookies
Print
Hot Fudge Sundae Macarons
- Prep Time: 30 mins
- Cook Time: 15 mins
- Total Time: 45 mins
- Yield: 24 1x
- Category: Cookies
Description
A rich, chocolatey macaron filled with a dollop of hot fudge and a swirl of creamy vanilla buttercream. Topped off with a dark chocolate drizzle and crushed peanuts. I mean…these macarons have it ALL and then some. Recipe comes with all then tips and tricks you need to make perfect macarons every single time!
Ingredients
For Macarons
- 100 grams finely ground almond flour
- 100 grams confectioner’s sugar
- 10 grams (2 TBSP) Dutch process unsweetened cocoa powder
- 100 grams egg whites, room temperature (from about 3 large eggs)
- 105 grams granulated sugar
- brown gel food coloring if desired (will make the macarons darker)
For Vanilla Buttercream
- 1/2 cup unsalted butter, room temperature
- 2 1/4 cups confectioner’s sugar, sifted
- pinch of salt
- 1–3 TBSP heavy cream or whole milk
- 1/2 tsp vanilla
You will also need:
- Hot fudge, slightly chilled
- 1/4 cup semi-sweet chocolate chips, melted
- chopped peanuts
Instructions
For Macarons
- Line two baking sheets with non stick silpat mats with macaron templates. Alternatively, line with parchment paper traced with 1 1/2 inch circles spaced 2 inches apart. Set aside.
- Into a large bowl, sift together the almond flour, confectioner’s sugar, and cocoa powder through a fine mesh sieve four times. Discard any large pieces of almond that do not sift through the sieve.
- In the bowl of a stand mixer, mix the egg whites on medium high speed until light an foamy, about 1 minute. Slowly add the granulated sugar, 1 tablespoon at a time, while continuing to whisk on medium high. Wait 10-15 seconds between each addition to be sure sugar is incorporated.
- After all of the sugar has been added, continue to beat the eggs whites on medium high speed until stiff peaks form. If adding gel food coloring, do so just before mixing is complete so as not to over mix the egg whites. The egg whites should be thick and fluffy and hold their shape when the whisk is turned upright. Continue mixing if the peaks fall over. Be careful not to over mix.
- Once the meringue is ready, add 1/2 of the sifted almond flour and sugar mixture to the egg whites and use a spatula to fold together. Do not “stir” the mixture but rather “fold” the ingredients together using broad, sweeping motions. Scrape from the bottom of the bowl and up and over the top of the mixture. Before incorporating fully, add the other 1/2 of the dry ingredients and continue the folding motion. Pause to press the batter firmly against the sides of the bowl every now and then to smooth the batter. Continue folding until the batter begins to flow like lava and you can lift the spatula making a figure 8 without the mixture breaking off. If it falls off, continue mixing for three or four folds at a time. Test again. The mixture is ready when the ribbon of batter melts back into itself in about 10 seconds. Do not over mix as your batter will become runny and the macarons will not bake properly.
- Scoop the batter into a pasty bag fitted with a 1/2 inch plain piping tip. Or use a thick ziploc bag fitted with the tip. Pipe the macaron batter onto the prepared templates. Circles should measure about 1 1/4 – 1 1/2 inches. When piping, hold the tip perpendicular to the silpat mat and apply pressure to the top of the piping bag to keep a continuous flow of batter through the tip. Release the pressure and use a small flick of the hand to end the flow of batter and leave a smooth top on the macaron.
- Repeat with remaining macarons. Tap each cookie sheet firmly on the countertop three times to release air bubbles.
- Preheat oven to 325 degrees.
- Allow the macarons to rest at room temperature for 30-60 minutes or until the tops of the cookies are dry to the touch. Depending on the weather, this can take over an hour. Do not skip this step or the macarons will not bake properly.
- Once dry, place a single sheet of macarons in the lower center rack of the preheated oven and bake for 13-15 minutes. Bake one sheet at a time and rotate half way through the baking time. The macarons are done when the tops are firm and remain attached to the “feet” when touched.
- Cool completely on the silicon mats for 6-8 minutes before carefully removing the macarons.
- Set aside while you assemble the filling.
For Vanilla Buttercream
- In the bowl of a stand mixer fitted with the paddle attachment, beat the butter on medium high speed until light and fluffy. Add the confectioner’s sugar slowly, continuing to mix on low speed at first until the sugar is incorporated. Increase the speed to high and mix for one minute.
- Add the salt, vanilla and 1 tablespoon of the heavy cream or milk. Mix on medium speed until combined and then increase to high speed. Mix for 2 minutes.
- If buttercream is too thick, add more heavy cream one tablespoon at a time. If too thin, add more confectioners sugar. The buttercream should be on the thick side so that it holds its form when piped onto the macarons.
- Transfer the buttercream to a piping bag fitted with a large star tip. To assemble the macarons, pipe the buttercream in a circle onto the flat side of a macaron, leaving a small hole in the center for the dollop of hot fudge. Using another piping bag fitted with a small 1/4 inch piping tip or a small spoon, place dollops of hot fudge in the center of the buttercream. Top with a second macaron and gently press together just slightly to join the cookies to the buttercream.
- Drizzle tops with melted chocolate and sprinkle with crushed peanuts.
- For best results, store assembled macarons in the refrigerator.


Mini Cherry Cheesecake Brownies

6 Comments
Christy
January 22, 2021 at 4:11 amOhhh I so want to.try but ….grams
..what’s that hahhah. Help I need ….cups and tablespoons
Heather Mubarak
January 23, 2021 at 12:10 amHi Christy,
Most of my recipes are written using standard measurements like cups and tablespoons but macarons can be a finicky cookie that can benefit from precise measurements. I always recommend using a kitchen scale to weigh your ingredients when making macarons.
Jocelyn Meusel
July 6, 2020 at 12:34 pmLoved loved loved making this recipe! If you’re a beginner macaron-maker, don’t be intimidated by any means – simply read the full recipe over a few times and take note of Heather’s tips and tricks. She did such a great job of laying out detailed instructions that mine came out as close to perfect as I could hope in my first try! Super tasty and delightful recipe.
Heather Mubarak
July 8, 2020 at 10:59 pmI am so happy that you found my tips and tricks helpful! Hope you have caught the macaron making bug and that you’ll be making lots more of them soon!!
Anna
June 28, 2020 at 5:58 pmHolly cow, these little cookies look absolutely incredible Heather! Loved reading all your handy tips and tricks, and can’t wait to bake some, fingers crossed they will look as good as yours! Your photos are freaking AMAZING!!!
Heather Mubarak
June 29, 2020 at 8:42 amThanks so much Anna! I love how these macarons turned out and I can’t wait to make them again!!