These easy and delicious two ingredient homemade chocolate bars are the perfect DIY gift for the holidays. Wrap them up and send them off to your friends and family for a special holiday treat!

The hustle and bustle of the holiday season is upon us and if you’re looking for a way to fast track your way onto everyone’s nice list, whip up a batch of these festive homemade chocolate bars. Made with just two ingredients and a quick prep time, these handcrafted chocolates get glammed up for gifting with some pretty wrapping and personalized gift tags. ‘Tis the season to spread some holiday cheer and nothing puts the merry in Christmas more than chocolate! These simple and delicious DIY chocolate bars are the perfect gift and I can’t wait to tell you how to make them.
THINGS YOU NEED TO MAKE HOMEMADE CHOCOLATE BARS
These homemade chocolate bars pretty much make themselves. With just two ingredients and a set of inexpensive silicone chocolate molds, you’ll be good to gift all season long.
Chocolate. These DIY chocolate bars can be made with dark, milk or white chocolate. Let your sweet tooth do the talking! For best results, use a good quality chocolate. Chocolate bars are best as chocolate chips often have a waxy coating that isn’t ideal for melting. I love Valhrona, Guittard or Ghirardelli.
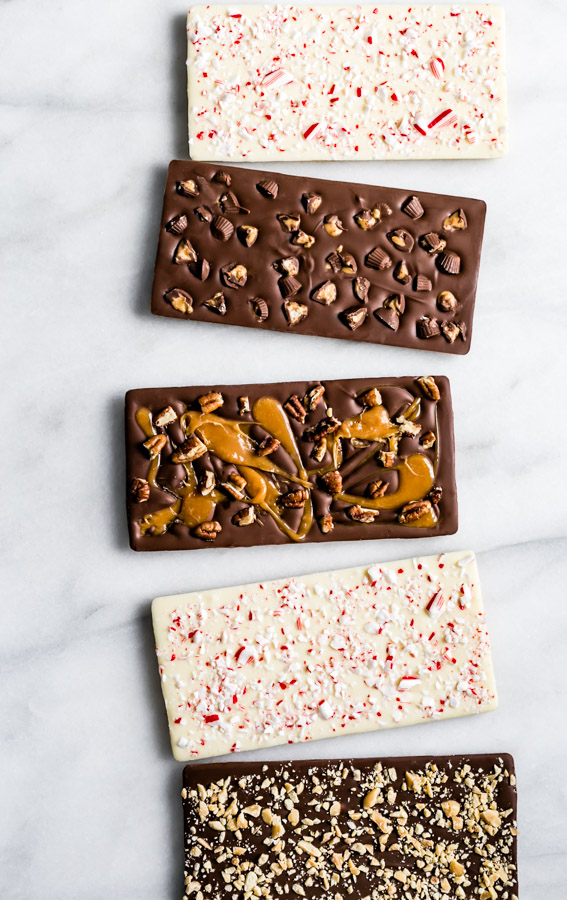
Mix-ins. Choose your favorite toppings to dress up these homemade chocolate bars. Some of my favorites include mini peanut butter cups, peppermint candy, chopped peanuts, toffee, cacao nibs, salted caramel and crushed Oreos. The possibilities are endless so pick your favorites and mix and match until your heart’s content!
Chocolate bar silicone molds. You will need a set of silicone chocolate molds to make these homemade chocolate bars. I love these from Amazon – they are inexpensive and the perfect size. Just pour the melted chocolate into the molds, chill and release. It’s that easy!

HOW TO MAKE THE BEST CHOCOLATE BARS
These homemade chocolate bars come together as easy as 1-2-3. Just follow the steps below and have fun creating your own delicious combinations.
STEP 1: MELT THE CHOCOLATE
To melt the chocolate, set up a double boiler over medium low heat. Bring the water to a simmer making sure that the bowl above is not touching the water. Add the chocolate and stir often until smooth and shiny. Remove from heat and keep the bowl over the hot pot of water to prevent the chocolate from setting as you work. If you prefer to temper your chocolate, follow the directions here. Untempered chocolate is more prone to melting at room temperature but if you are just noshing on these chocolate bars at home and gifting them within a few days, untempered chocolate will work just fine. If you are mailing these chocolate bars to a far off destination or live in a very warm climate, I recommend tempering the chocolate first.


STEP 2: POUR MELTED CHOCOLATE INTO MOLDS
Once the chocolate is fully melted and smooth, use a spoon or measuring cup to pour the chocolate into clean, dry silicone molds. Fill only to the top line of the mold and use an offset spatula to smooth the tops.

STEP 3: ADD TOPPINGS AND CHILL
Now comes the fun part! Add any toppings you like to the melted chocolate before it begins to set. Just a tablespoon or so will do. I’ve listed a few of my favorite flavor combinations below. This a choose your own adventure kind of treat so follow your cravings and create the ultimate homemade chocolate bars.
- Dark Chocolate Toffee
- Milk Chocolate Peanut Butter Cup
- White Chocolate Peppermint
- Milk Chocolate Peanut
- Dark Chocolate Salted Caramel
- Milk Chocolate Mint Oreo
- White Chocolate Macadamia Nut
The list goes on and on. Other ideas include cacao nibs, pecans, rocky road, freeze dried strawberries and chopped pistachios. Pick your all-time favorite and make it your signature candy bar or dream up a few new flavor combinations that everyone will love.
STEP 4: REMOVE BARS FROM MOLDS AND WRAP
Once the toppings are added, allow the bars to sit at room temperature for about 10 minutes. Carefully transfer the molds to a cookie sheet and place them the refrigerator to set for 20 minutes. If the chocolate is still soft or sticky to the touch, chill for a few minutes more. Remove the bars from the fridge and gently peel the molds away from the chocolate. They should separate easily if the chocolate is set properly. Now you’re ready to wrap!

THINGS YOU NEED TO WRAP DIY CHOCOLATE BARS
Parchment paper. If you are giving these homemade chocolate bars to all of the chocolate lover’s on your holiday list, you’ll want to wrap them first in a food grade paper. I love If You Care’s 100% Compostable Unbleached Parchment Baking Paper. It’s chemical free and completely recyclable which makes me feel great about using it. I use If You Care Parchment Baking Sheets in my kitchen everyday and now it’s also perfect for wrapping my favorite edible gifts!
Wrapping paper and ribbon or twine. Now’s your chance to get crafty in the kitchen with some wrapping paper and ribbon. I love buying sheets of pretty holiday paper at custom paper stores to dress up these DIY chocolate bars for the holidays. Add some twine and a sprig of rosemary and you’re good to gift!
Custom gift tags. Nothing says Happy Holidays like a custom gift. Add some festive wrapping to your friend’s and family’s favorite chocolate bars and then print out a custom gift tag. Add a heartfelt message, a holiday jingle or just a love note to show you care. I love these modern, personalized tags from Avery. You can print them at home and customize them however you like. Easy peasy!

HOW TO WRAP CHOCOLATE BARS FOR HOLIDAY GIFTING
Once you have all of your bits and bobbles to wrap the chocolate bars, start by wrapping each bar in parchment paper just like a present. Use double sided tape to seal the paper on the backside of the bars. Then cut strips of wrapping paper to layer accross the center the bars and seal again with tape on the backside. Use paper clips, ribbon or twine to attach the custom gift tags and decorate each bar with a sprig of rosemary, mini bows or pinecones. Just have fun with it-there are no rules! Store the wrapped chocolate bars in the refrigerator until ready to gift.


These homemade chocolate bars are the perfect holiday gift for everyone on your list. They are easy to make and delicious to eat and everyone loves chocolate for the holidays! Find the full recipe here at The Feedfeed.
Happy Holidays!
If you love these Homemade Chocolate Bars, you’ll also love…
5 Ingredient Dark Chocolate Pretzel Bark
Chocolate Dipped Hazelnut Biscotti
The Ten Best Holiday Cookies Ever
**Post originally sponsored for Instagram by If You Care and The Feedfeed.


The Best Brown Butter Toffee Chocolate Chunk Cookies

3 Comments
Diana
June 5, 2024 at 4:57 pmWhat kind of tape did you use to seal the parchment paper?
G. Smith
July 14, 2023 at 9:39 pmHi, can I ask how long the bars would be in date from malign them until they have to be eaten? Thank you.
Anonymous
July 1, 2022 at 7:31 pmGOOD CHOCOLATE RECEIPE