Cookies
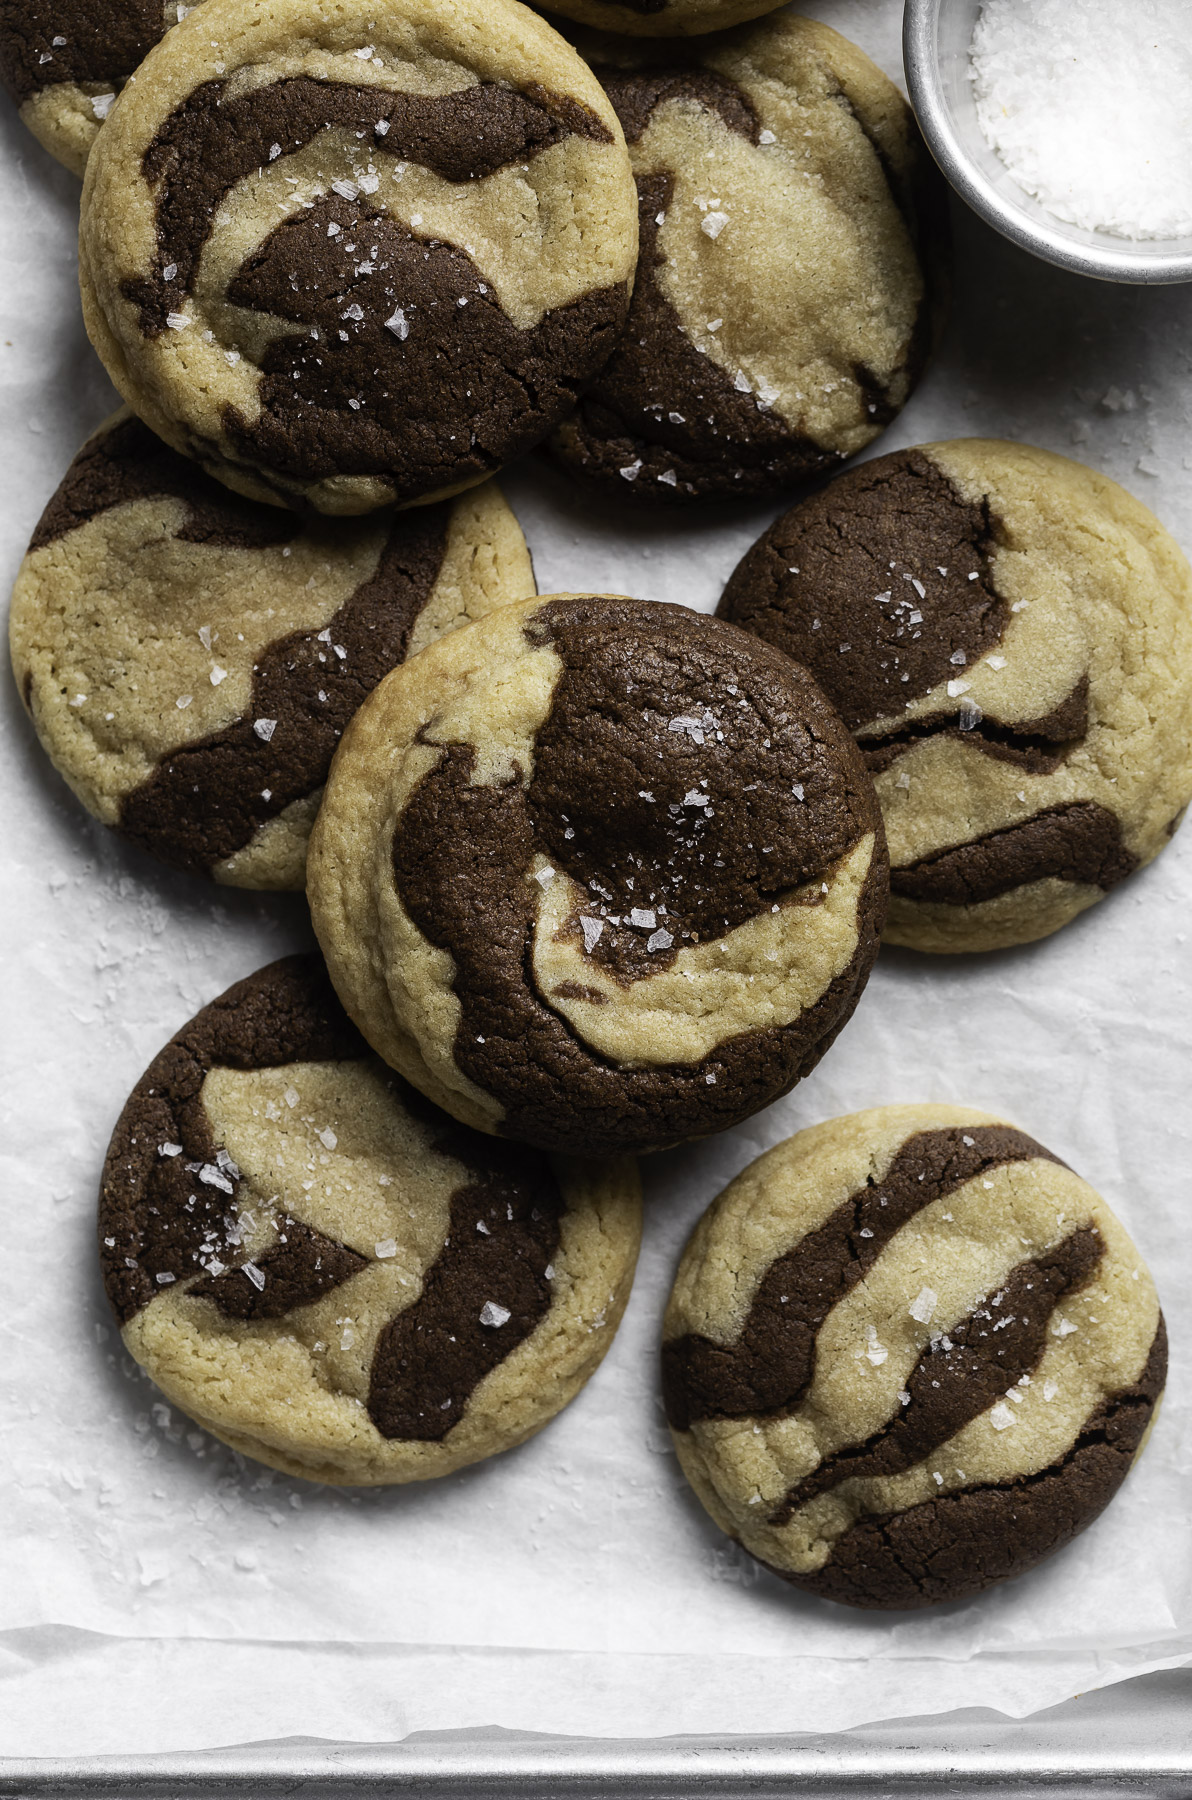
Chocolate Marble Cookies
June 15, 2022
These soft and chewy Chocolate Marble Cookies are equal parts decadent and delicious. Made with just a handful of simple […]
These soft and chewy Chocolate Marble Cookies are equal parts decadent and delicious. Made with just a handful of simple ingredients (and no chill time!) these half cookie/half brownie hybrids are the best of both worlds!
Father’s Day is just around the corner and we all know Dads deserve the very best! So today we’re pulling out all the stops and baking up a special dessert that is equal parts decadent and delicious.
If the way to the heart of all the father figures in your life is through food, look no further than these soft and chewy, super chocolatey marble cookies. It’s the perfect easy treat to make for your guy this Father’s Day and I can’t wait to tell you all about them!

This post is sponsored by C&H® Sugar. As always, all thoughts and opinions are 100% my own. Thank you for supporting the brands that help make Browned Butter Blondie possible.

Why you should make these cookies:
Cookies are always a good idea and there’s a lot to love about these half cookie/half brownie hybrids.
- Easy to make. These cookies come together in no time with just a handful of simple ingredients (and no chilling time!) so you can stay out of the kitchen and spend more time with Dad!
- 10 out of 10 for taste and texture. Soft, chewy, fudgy and oh-so chocolatey…these cookies check all the boxes! I highly recommend making a double batch because they won’t last long.
- Make ahead. The cookies will stay fudgy and moist for days after they are made. Whip up a batch and enjoy delicious cookies all week long. Or store the dough in the freezer for an indulgent late-night snack.
- They’re delicious! Every bite is filled with both fudgy brownie and classic chocolate chip cookie flavor – everyone will 100% LOVE these cookies!

Ingredients you need:
Cookies are my go-to dessert because they’re made with simple ingredients you probably already have on hand like butter, eggs, sugar and flour. Just a handful of basic ingredients and 30 minutes stand between you and a warm batch of cookies. Here’s what you’ll need…
- Flour. We’re using regular all-purpose flour and bread flour for this recipe. Bread flour gives the cookies that extra “chew factor” that I love so don’t skip it unless you simply cannot muster the energy to grab a bag at the store. I highly recommend measuring the flour with a kitchen scale. If your cookies bake up puffy and cakey, it’s likely you added too much flour. If you don’t have a digital kitchen scale, use the spoon and level method to measure the flour for best results.
- Eggs. For best results, make sure your eggs are at room temperature before mixing the batter. If you forgot to set your eggs out ahead of time, place them in a bowl of warm water for 10 minutes to bring them to room temp.
- Sugar. Sugar is the basic building block of any cookie dough. For the ultimate cookie deliciousness, I always reach for C&H® Granulated Sugar and Light Brown Sugar {dark brown sugar works in a pinch!}. C&H® is pretty much the gold standard -they’ve been crafting quality sugar and happiness since 1906! In addition to adding sweetness, granulated and brown sugar add structure, moisture and plenty of chewiness to these brookie cookies. And I love that I can order it for quick delivery to my doorstep through Amazon or Chicory. Use the “Get Ingredients” tab on the C&H® site to order the ingredients for this recipe and select pickup or delivery. Now I can have cookies anytime the craving strikes!
- Butter. One of the reasons I love this recipe so much is that there’s no need to plan ahead and bring the butter to room temperature. We’re using a stick of butter straight from the fridge. This is good news bakers!
- Cocoa powder. I recommend Dutch-process cocoa powder for the best taste and a rich, dark cocoa color. And it’s always a good idea to sift the cocoa before adding it to dough to remove any lumps and bumps.
- Baking soda. A tiny bit of leavening agent goes a long way to help give the cookies a little lift. Make sure your baking soda is fresh by checking the expiration date on the canister.
- Chocolate chips. Feel free to choose your own adventure here. You can load your chocolate chip cookie dough up with dark chips, mini chips or even milk chocolate chips. If you’re looking to make these marble cookies even more decadent, add a handful of chocolate chips to the chocolate batter too. Double yum!

How to make chocolate marble cookies
These cookies do require you to split the dough in two. This this extra step is really is easy and just takes an extra couple of minutes. Let’s walk through the recipe step-by-step before you get started.
Step 1: Preheat the oven to 375°F. Line two baking sheets with parchment paper and set aside.
Step 2: Melt the chocolate.
We’ll start by melting the chocolate so it has a few minutes to cool before adding it to the dough. Melt the chopped chocolate in a heat safe bowl in the microwave in 30 second increments. Stir after each cycle and repeat until smooth and shiny. Then set it aside to cool slightly while you mix the other ingredients.

Step 3: Make the cookie dough.
Because we’re using cold butter straight from the fridge, it won’t cream together with the sugars in the same way that room temperature butter does. Still be sure to mix the butter and sugars for a full three minutes and then scrape down the sides of the bowl before adding the other ingredients. Once you’ve added the flour, be careful not to over mix the dough.
Step 4: Divide the dough in half and add flour and chocolate.
Once the cookie dough is prepared, divide the dough in half. Place one half in a small bowl and leave the other half in the stand mixer. I highly recommend using a kitchen scale at this point to ensure you have equal amounts of dough. Once the dough is split in two, add 1 tablespoon of bread flour to the half of the dough in the stand mixer. Mix to combine for about 30 seconds. To the other half of the dough, add the melted chocolate and 1 tablespoon of Dutch-process cocoa powder. Stir with a spatula until fully combined.

Step 5: Roll the dough into balls and bake.
Using your hands, roll all of the plain and chocolate dough into a ball that weighs about .5 ounces. I highly recommend using a simple kitchen scale for this step to ensure that all of your cookies are the same size. Once all of the dough is rolled into balls, use your hands to join two plain cookie dough balls and two chocolate balls together, rolling until smooth. Divide the dough ball in half with your fingers and rotate one ball about 120 degrees. Join the balls of dough back together and roll until smooth again. The more you do this, the more marbled your cookies will be, but don’t overwork the dough too much. Place the cookie dough balls on the prepared baking sheets, 3 inches apart as they will spread in the oven. Bake for 6 minutes and then remove the cookie sheet from the oven and give it a firm tap on the kitchen counter to help flatten the cookie. Rotate the pan and continue baking for about 3 minutes until the edges are set. Remove the pan from the oven and give it a firm tap on the countertop once more. Cool on the baking sheet for 5-7 minutes before using a spatula to transfer to a wire rack to cool completely.


Tips for the best cookies
These cookies could not be easier to make and it’s a fun recipe for the whole family to make together. Here’s a few tips and tricks for a picture-perfect cookies every time.
Use a kitchen scale to weigh ingredients. If your cookies are turning out extra thick and cakey, you’ve likely added too much flour to the dough. For best results, use a digital kitchen scale to take all the guesswork out of measuring your ingredients.
Do not over mix. We don’t want our marble cookies to bake up flat and dense, so once you’ve added the dry ingredients, don’t be tempted to over mix the dough.
Use damp hands to roll the dough. If you find the dough to be a bit tacky, dampen your hands just slightly just before you roll the cookies into balls. You can also spray them lightly with non-stick baking spray. It’s helpful to roll all of the plain dough and then wash your hands before rolling all of the chocolate dough.
Do not over bake. I’ve said it before and I’ll say it again. Do not over bake! Cookies are actually best when ever-so-slightly underbaked. Remove the cookies from the oven once the cookies are just golden brown around the edges. Thanks to the residual heat from the baking sheet, the cookies will continue to bake as they cool.

FAQ’s
Absolutely! The chocolate portion of the cookies will bake up a bit lighter and have a slightly different chocolate flavor.
Yes! You’ll be happy to know these cookies are super freezer friendly. Once baked, cool the cookies completely and then transfer to a large plastic bag or storage container. They’ll keep for up to 2 months and they taste fantastic fresh from the freezer!
You betcha! To freeze the marble cookie balls before baking, place them on a cookie sheet and freeze for one hour. Then transfer the balls to a plastic bag and store tightly covered for up to 3 months. Bake the cookies off one at time or in batches – no need to defrost before baking but do add a minute or two to the bake time.
Great idea! Feel free to add nuts or extra chocolate chips to the cookie dough. The possibilities are endless.
Happy baking!

Love cookies?? Try these recipes:
- Peanut Butter Pretzel Cookies
- The Ultimate Chocolate Chip Cookies
- Hot Chocolate Cookies
- Salted Caramel Chocolate Chip Cookies For Two
- Wanna-Be Brownie Cookies

Chocolate Marble Cookies
- Prep Time: 20 minutes
- Cook Time: 9 minutes
- Total Time: 29 minutes
- Yield: 24 cookies 1x
- Category: Cookies
- Method: Baking
- Cuisine: American
Description
These soft and chewy Chocolate Marble Cookies are equal parts decadent and delicious. Made with just a handful of simple ingredients (and no chill time!) these half cookie/half brownie hybrids are the best of both worlds!
Ingredients
- 2 cups (250 g), plus 1 tablespoon all-purpose flour, spooned and leveled (divided)
- 3/4 cup (95 g) bread flour, spooned and leveled
- 1 teaspoon baking soda
- 1 teaspoon cornstarch
- 3/4 teaspoon salt
- 1 cup (226 g) unsalted butter, cold and cubed
- 3/4 cup (150 g) C&H® light brown sugar
- 1/2 cup (100 g) C&H® granulated sugar
- 1 large egg, plus one egg yolk, room temperature
- 2 teaspoons vanilla
- 1 tablespoon Dutch process cocoa powder, sifted
- 4 ounces semi-sweet or bittersweet chocolate chips (or chopped chocolate bar), melted
- 1/2 cup semi-sweet chocolate chips, optional
Instructions
- Preheat the oven to 375 degrees. Line two baking sheets with parchment paper and set aside.
- Remove the butter from the fridge and cut into cubes. Place it in the bowl of a stand mixer fitted with the paddle attachment.
- In a microwave safe bowl, melt 4 ounces of chopped chocolate or chocolate chips in 30 second increments. Stir between each cycle until smooth and shiny. Set aside to cool for 5 minutes while you make the dough.
- Cream the butter with the granulated and light brown sugars for 3 minutes until lighter in color. Scrape down the sides of the bowl.
- Add the egg and egg yolk, one at a time until full incorporated. Add the vanilla and mix to combine. Scrape down the sides of the bowl.
- In a medium bowl, combine the 2 cups (250 g) of flour, ¾ cup (95 g) of bread flour, baking soda, cornstarch and salt. Whisk to combine. Add the dry ingredients to the sugar and butter mixture and mix until just combined. Do not over mix.
- Divide the dough in half. It’s helpful to use a kitchen scale to ensure the dough is divided in equal portions. Place one half back in the bowl of the stand mixer. Add the additional tablespoon of flour and mix until just combined. This will be your plain dough. Add the chocolate chips to the dough now if desired. Place the other half of the dough in a medium bowl and add the melted chocolate and cocoa powder. Stir with a spatula or wooden spoon until well combined. This will be your chocolate dough.
- Use a kitchen scale to divide each of the doughs into .5 ounce portions. If the dough is tacky, dampen your hands or spray lightly with non-stick baking spray before rolling into balls. It is helpful to roll all of the vanilla dough balls and then wash your hands before rolling all of the chocolate balls. Once all of the cookie dough is portioned out, take two plain dough balls and two chocolate dough balls. Stack them together and then roll them between the palms of your hands to marble the dough together. Divide the dough in half with your fingers and turn one dough ball about 120 degrees. Bring the two portions back together and smooth into a ball with your palms once more. The more you repeat this step, the more marbling your cookies will have once baked. Do not over due it as the dough will lose the marbling effect.
- Bake the cookies for 5 to 6 minutes and then remove the pan from the oven and give tap it firmly on the countertop twice to help flatten the cookies. Rotate the pan and return it to the oven for 3 to 4 minutes more. The cookies are done when the edges are set and the centers are puffy. Tap the baking sheet once more on the countertop.The cookies will deflate slightly as they cool. Remove the pan from the oven and let cool for 5 minutes before transferring to a wire rack to cool completely.
Notes
Cookie dough may be frozen tightly wrapped for up to 3 months.
Cool baked cookies completely before freezing.


Orange Pound Cake

13 Comments
Michelle
June 9, 2023 at 5:59 amDo you have a video of the combining/rolling process? Not sure what you mean by stack.
Ann
February 22, 2024 at 9:49 pmI was looking for a video too. I found this one that shows stacking (of just one ball of plain & one ball of chocolate) https://www.youtube.com/watch?v=sxmBuDboIZY Around minute 0:40
Jill
December 12, 2022 at 5:06 amThese cookies are delicious!! They are on the fluffier side from the bread flour but they are delicious nonetheless!
Heather Mubarak
December 17, 2022 at 5:47 pmThey’re always a hit at my house! Thanks for trying my recipe!!
Michelle
October 22, 2022 at 6:24 amOutstanding! I get so many compliments on these cookies
Sage
October 5, 2022 at 11:32 pmIs it correct to use baking soda? Usually with Dutch-processed cocoa, you need baking powder. If you use baking soda, you can end up with a soapy flavor.
Heather Mubarak
October 6, 2022 at 1:16 amYes, baking soda is correct. There is such a small amount of Dutch cocoa powder in the recipe and I promise there is no soapy flavor at all. Hope you love them as much as we do!
Katya
September 19, 2022 at 6:05 pmCan we omit / substitute bread flour?
Heather Mubarak
September 19, 2022 at 8:42 pmYes, you can substitute with an equal amount of more all-purpose flour.
Anonymous
September 2, 2023 at 12:52 amWould cake flour be an option for the substitute bread flour?
Heather Mubarak
September 3, 2023 at 9:33 pmI would just use all all-purpose flour if you don’t have bread flour. Enjoy!
Lauren Ronde
July 11, 2022 at 10:49 pmThese were absolutely DELICIOUS!!! They came out so perfect and I got so many complements about how good they tasted. Truly an amazing marble cookie recipe. I will be making these again, for every holiday!!!
Suzie
June 21, 2022 at 2:13 pmYum! I can’t wait to try these cookies. Best of both worlds!