Bars & Brownies • Currently Craving • Seasonal
Peanut Butter S’mores Bars
June 27, 2023
You’re in for a real treat today bakers! Summer is in full swing and the time seems right for a […]

You’re in for a real treat today bakers! Summer is in full swing and the time seems right for a brand new s’mores recipe. We are wasting no time kicking off s’mores season with a delicious twist on everyone’s favorite summertime dessert. A classic s’mores is good and all, but these peanut butter s’mores bars take the classic dessert we all know and love to a whole new level. And the best part is, you don’t even need a campfire.
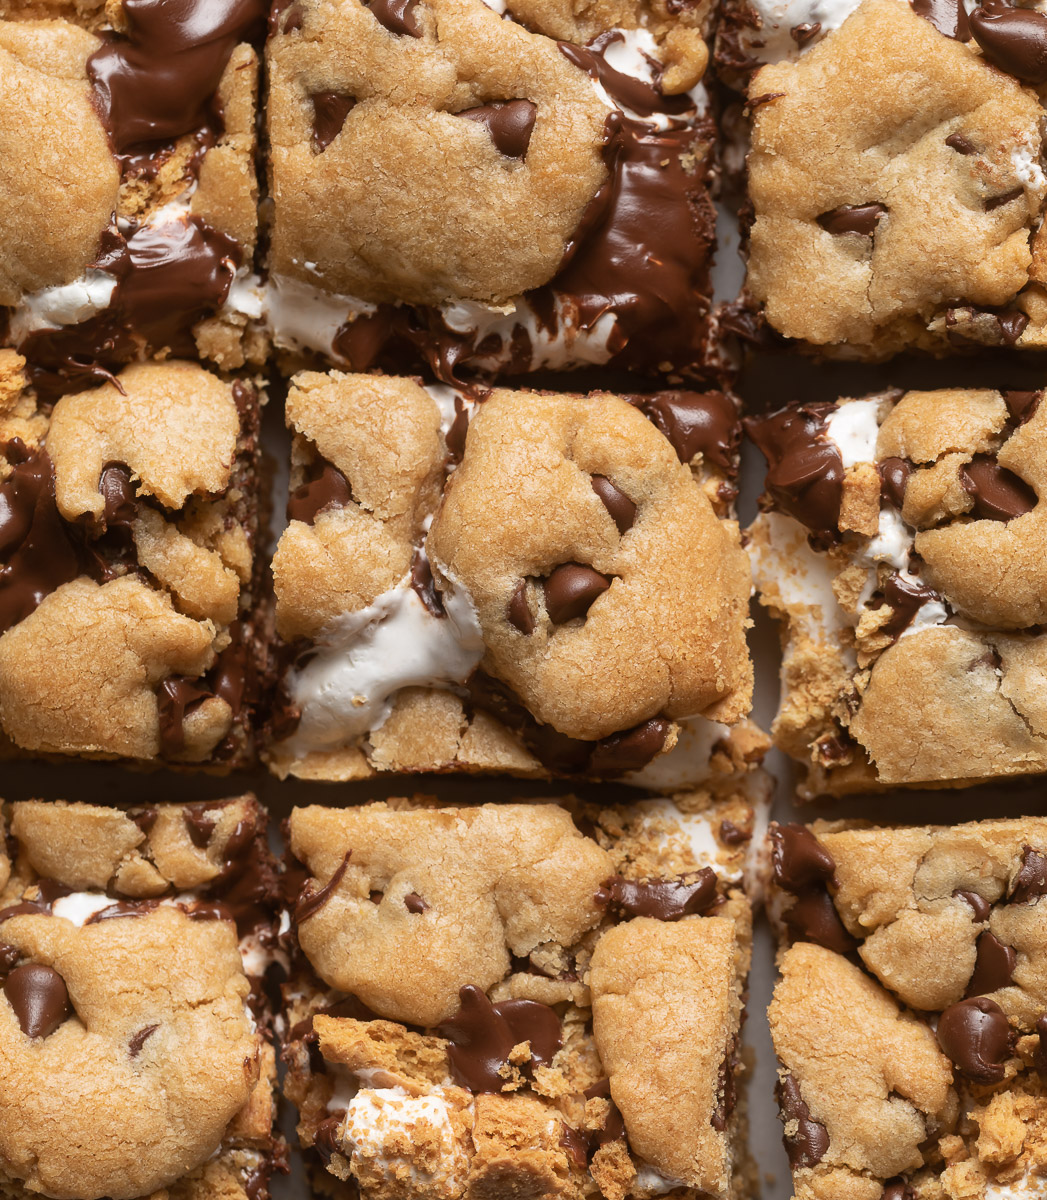
If I could choose one word to describe these bars it would be EPIC. These cookie bars have it all and then some. Ribbons of gooey marshmallow fluff running through layers of peanut butter cookie dough topped with melted chocolate and crushed graham cracker crumbs. These bars need to be on repeat in your kitchen starting NOW so let’s dive right in.

What makes these bars so good?
Incredible flavor. These bars pack a delicious trio of flavors for the ultimate summertime s’mores treat. We’re talking about a brown butter, peanut butter graham cracker cookie dough topped with a layer of fluffy marshmallow creme and pools of melted chocolate. Umm, need I say more??
The best texture. These one pan bars have it all! Buttery soft graham cracker cookie dough, crunchy layers of crispy grahams, gooey marshmallow fluff and shiny puddles of melted chocolate. One bite and you’ll never make regular s’mores again!
Easy to make. Don’t let the fact that these bars have multiple layers scare you off. They are easy to make with just a few simple steps. The only layer you’ll make from scratch is the peanut butter cookie dough. Top it with layers of marshmallow creme, crushed graham crackers and chocolate chips. Don’t expect these bars to look perfect – just lick your fingers and move along with your day.

Ingredients you need to make s’mores bars
You could make a regular ‘ol s’mores or you could stuff all of your favorite summertime flavors into a batch of these ridiculously delicious peanut butter s’mores bars. With layers of peanut butter cookie dough, crushed graham crackers, gooey marshmallow and lots of melted chocolate, these bars are so fun to make and even more fun to eat! No campfire needed! Here’s what you’ll need….
- Flour – regular all-purpose flour gives these bars great taste and texture.
- Butter – browned butter makes these bars seriously EPIC! Don’t skip this step, it’s 1000% worth it.
- Sugar – a combination of light brown sugar and granulated sugar add the perfect amount of sweetness.
- Eggs – we’re using one large egg and one egg yolk. Make sure your eggs are at room temperature.
- Peanut butter – I’m partial to smooth pb but by all means, use a chunky variety if you wish. Either way, the peanut butter should be room temperature.
- Graham crackers – did someone say graham crackers inside the cookie dough?? Yes, please!
- Marshmallow creme – store-bought marshmallow creme makes this recipe easy peasy but feel free to whip up your own from scratch. Do not substitute the creme with regular marshmallows.
- Chocolate chips – measure these babies with your heart….more is more!
- Vanilla – always use a good quality vanilla extract for the best flavor.
How to make s’mores cookie bars
These bars are simple to make and easy to whip up in a hurry with just a handful of basic ingredients. Follow this step-by-step guide and check the recipe card below for the ingredient list and detailed instructions.
Step 1: Brown the butter and chill for 20 to 30 minutes until soft and cold, but not solid.
Step 2: In the bowl of a stand mixer fitted with the paddle attachment, cream together the brown butter, sugars and peanut butter until light and fluffy, about 4 minutes. Scrape down the sides of the bowl.
Step 3: Add the egg and egg yolk followed by the vanilla. Mix to combine well.
Step 4: Add the dry ingredients and mix on low speed to combine. Do not overmix. Stir in the chocolate chips using a spatula.
Step 5: Cover the bowl and chill for 30 to 40 minutes. Meanwhile, line an 8 x 8 inch baking pan with parchment paper. Transfer about 3/4 of the cookie dough to the prepared pan, using your hands to press the dough into the corners of the pan, leveling the top.
Step 6: Top with the marshmallow creme, using an offset spatula or large spoon to spread it to the edges of the dough.
Step 7: Top the marshmallow creme with crushed graham crackers and chocolate chips.
Step 8: Using your hands, flatten out small bits of the remaining peanut butter cookie dough. Place the dough randomly over the top of the chocolate chip and graham cracker layer, leaving space between for the marshmallow creme to show through.

Step 9: Bake the cookie bars at 350°F for 23 to 25 minutes. The top should be golden brown and the edges set. For best results, do not overbake.
Step 10: Remove the bars from the oven and cool 15 minutes before slicing into squares.

Tips for the best cookie bars
Cookie bars are one of my favorite things to bake. They’re quick, easy and perfect for sharing with a crowd. Follow the tips below to make the very best peanut butter s’mores bars that are full of toasty, chocolatey, peanut buttery goodness.
Brown the butter. For next level flavor, brown butter is where it’s at folks. You might be tempted to skip this step to save on time but you will be sorry. Just sayin’. The brown butter elevates the taste of the peanut butter cookie dough and makes these bars positively irresistible. Browning butter on your stovetop is easy and takes just 5 extra minutes. Be sure to plan ahead and leave time to chill the browned butter before creaming it with the sugars. Hot melted butter will create a dough that is too soft. If you’ve never browned butter before, not to worry! Head to this post for everything you need to know.
Use creamy peanut butter. Save the all-natural peanut butter for your morning smoothie. For the best texture and flavor, use regular creamy peanut butter like Skippy or Jif. Make sure it’s at room temperature so that it incorporates into the batter easily.
Do not over bake. S’mores are meant to be messy and so are these bars. To keep those gooey puddles of marshmallow fluff and melted chocolate, be sure to underbake the bars just slightly. The edges should be just set and the top will be a nice golden brown. The bars will continue to bake a bit once the pan is removed from the oven and you’ll have perfectly soft, fudgy, heavenly cookie bars. So. Much. Yum!
Enjoy warm from the oven. Normally I’d tell you to let your cookie bars cool completely before slicing so you can get those perfect, sharp edges. But no one can wait to dig into these fresh from the oven s’mores bars. Let the bars cool for about 15 minutes and then slice them up and enjoy while they’re still warm. Betcha can’t have just one!

Is marshmallow creme better than regular marshmallows?
After experimenting a bit {tough job, but someone’s got to do it} with both regular marshmallows and marshmallow creme – the choice was clear. Standard size marshmallows didn’t melt enough into the peanut butter cookie batter and mini marshmallows melted almost too much. A generous layer of simple marshmallow creme {also called fluff} made for pockets and puddles of ooey gooey marshmallow that give this treat the perfect s’mores flavor in every bite.
No need to be too ambitious and make our own marshmallow creme. The store bought stuff works great and saves on time so you can sink your teeth into warm from the oven peanut butter s’mores bars sooner than later. Pro-tip: marshmallow creme is notoriously messy and tough to spread. Spoon the fluff on top of the cookie dough, placing dollops evening across the top. Then use the back of a spoon or offset spatula that has been run under warm water to spread the creme across the dough. Remember, the messier the better when it comes to s’mores so don’t try to make the layers too perfect.

How to store cookie bars
I won’t judge you one bit if you eat these peanut butter s’mores bars all in one sitting. They’re pretty irresistible if you ask me. If you do have any of this ooey gooey deliciousness left over, keep it tightly covered at room temperature for maximum freshness. This might be a good time to mention that these bars are equally irresistible straight from the freezer. Cold s’mores?? I know – sounds strange, but it’s sooooo good!
To freeze the cookie bars, cool completely and then wrap the bars in two layers of plastic wrap. Place inside a large freezer bag and freeze for up to 2 months. Defrost at room temperature before serving or heat in a 300°F oven for 5-8 minutes to bring back that gooey texture.

I hope you’ll make these peanut butter s’mores bars to share at your next backyard bbq or poolside party. These bars travel well so they are perfect for toting all over town. Everyone will love them!
Happy baking!
If you love these peanut butter s’mores bars, you’ll love these easy and delicious recipes:

Peanut Butter S’mores Bars Recipe
- Prep Time: 15 min + chill time
- Cook Time: 25 min
- Total Time: 40 min + chill time
- Yield: 16 bars 1x
- Category: Bars & Brownies
- Method: Baking
- Cuisine: American
Description
These peanut butter s’mores bars have all of your favorite summertime flavors stuffed into one easy and dangerously delicious cookie bar. Put these bars on repeat all summer long!
Ingredients
1/2 cup (113 g) unsalted butter, browned and chilled
1 3/4 cups (220 g) all-purpose flour, spooned and leveled
1/4 cup (30 g) finely crushed graham crackers
1/2 teaspoon baking powder
1/4 teaspoon baking soda
1/4 teaspoon kosher salt
3/4 cup (150 g) light brown sugar, packed
1/4 cup minus one tablespoon (38 g) granulated sugar
1/3 cup creamy peanut butter {not all natural}
1 large egg, room temperature
1 large egg yolk, room temperature
1 teaspoon vanilla
1 1/4 cup semisweet chocolate chips, divided
5 ounces marshmallow creme (about 3/4 jar)
1/2 cup roughly crushed graham crackers
Instructions
To brown the butter, place butter in a medium saucepan over medium heat. Stir occasionally until butter has melted. Continue stirring often as butter begins to foam and crackle. Do not leave the butter unattended at this stage. Stir the butter as it sizzles and after about 4-5 minutes, bits of golden brown butter solids will fall to the bottom of the pan. The crackling sound will stop and the butter will be aromatic and amber in color. Carefully pour the butter into a heat safe bowl and let it sit at room temperature for 10 minutes. Transfer the bowl to the refrigerator to chill until the butter becomes more solid, about 20 minutes. The butter should be soft, not liquid, but not too solid.
While the butter chills, crush the graham crackers using a food processor until they resemble fine crumbs. Alternatively, you can place the graham crackers in a large plastic bag and use a rolling pin to crush them.
In a medium bowl, whisk together the flour, crushed graham crackers, baking powder, baking soda and salt. Set aside.
When the butter is chilled, transfer it to the bowl of a stand mixer fitted with the paddle attachment. Add the sugars and peanut butter. Cream the mixture together on medium high speed for 4 minutes, until light and fluffy.
Add the egg, followed by the egg yolk, mixing completely before adding the next. Add the vanilla and combine well.
Add the flour mixture, in two additions, mixing on low speed until just a few streaks of flour remain. Do not over mix. Remove the bowl from the stand mixer and stir in 3/4 cup of the chocolate chips.
Cover the bowl and refrigerate for 30-40 minutes.
When the cookie dough is ready, preheat the oven to 350°F. Line an 8 x 8 inch pan with parchment paper, covering the bottom and all sides. Allow the ends to hang over by about 2 inches for easy removal of the bars once baked.
Place about 3/4 of the cookie dough (just eyeball it) on the bottom of the pan and use your hands to press it into the edges and level the top.
Use a spoon to dollop the marshmallow creme on top of the cookie dough. With an offset spatula or the back of a spoon, spread the marshmallow creme evenly over the top.
Sprinkle the roughly crushed graham crackers over the top of the marshmallow creme. Add the remaining chocolate chips, distributing evenly.
Use your hands to flatten bits of the remaining cookie dough and place the dough on top of the graham crackers and marshmallow creme. Leave some open space in the pan for the marshmallow creme to peak through when baking.
Bake for about 25 minutes or until the top is golden brown and the edges are set. For a gooey cookie bar, bake for 23-25 minutes. For a firmer bar, add an additional 2 minutes to the baking time.
Remove the pan from the oven and cool completely before slicing.
Notes
**This recipe was originally posted in May 2021.
Store tightly covered in a cool, dry place for up to 4 days.
May be frozen.
Craving More?


Best Chocolate Chip Cookie Recipe


16 Comments
Kristin
July 5, 2023 at 5:25 pmThese were INCREDIBLE! They look like they are going to be too sweet but they are the perfect amount of sweetness! It think its the peanut butter that helps round them out. Which, if you aren’t a huge PB fan you’ll still like them because it is perfectly balanced and not overpowering! They somehow aren’t super heavy so it makes you want to eat 500. My friends raved about them and told me they were the best thing I’ve ever made – definitely a keeper! Thanks, Heather!!
Traci
July 2, 2023 at 1:57 amOh. My. Gosh. These were AMAZING! Definitely recommend eating them warm! Instead of adding chocolate chips to the middle layer, I chopped half of a Ghirardelli milk chocolate bar. Melted chocolate chunks are always delicious. This will be on a regular rotation!
Suzie
June 29, 2023 at 12:41 pmThese look delicious and like the perfect summer treat!
Kristin T.
June 28, 2023 at 6:43 amThese bars were SO easy to throw together and they taste AMAZING!! Everyone loved them at the neighborhood block party. Will be keeping this recipe handy!!!
Robin
April 29, 2022 at 12:57 pmOverall I thought that these bars were fantastic! I will be packing some to bring to my friend this weekend. I found my dough to be a little dry, so when I make these again I will add a tablespoon of milk to add some moisture back in.
Rachel
July 27, 2023 at 6:24 pmDid you have a chance to try it with the added milk? If so, how’s it turn out and how much did you add? Thanks!
Nikki
March 10, 2022 at 6:48 pmThis recipe looks amazing, would it be possible to use mini marshmallows instead of creme marshmallow??
Heather Mubarak
March 12, 2022 at 8:08 pmFor the best texture, I highly recommend using marshmallow creme rather than marshmallows. Enjoy!!
Shelly
July 15, 2021 at 12:23 amThese sounds fantastic.
Wondering about leaving out the peanut butter? Would you increase the amount of butter?
Thanks for your help,
Shelly
Heather Mubarak
July 15, 2021 at 5:11 amHi Shelly! I haven’t made these without the peanut butter but you could definitely try almond butter in it’s place.
Shelly
July 16, 2021 at 6:59 amHi Heather
I will try that. I have tried many of your recipes, and have loved them all!
Thanks so much!
Heather Mubarak
July 16, 2021 at 6:23 pmSo glad to hear it!!
Casie
July 8, 2021 at 5:21 amThese were delicious! I will definitely be making these again.
Heather Mubarak
July 9, 2021 at 6:17 amYay! So happy you liked them!!
Macey
July 5, 2021 at 4:36 pmOh my gosh, I made these for a 4th of July bbq and they were a HIT. First thing gone at the dessert table and everyone was raving about them!! They were soft, gooey, and absolutely delicious. Not to mention they look amazing too! For the chocolate I used both chocolate chips and a chopped milk chocolate bar and it was heavenly!! A few recipe notes: the prep time was longer than what’s listed on the recipe, mainly because the butter took a lot longer than 20 minutes in the fridge to solidify. Additionally, I doubled the recipe using the 2x button above, and noticed that when I did this the amount in cups/tsp doubled correctly but the grams didn’t change for many of the ingredients so just something to pay attention to! Overall this recipe was fantastic and I will definitely be making again! Thank you!!
Anaga
June 15, 2021 at 7:11 pmThese turned out so well!! They were so easy to make and a total hit with my family